Using LVM
Flexible volume management
LVM2 permits you to create partitions spreading on multiple disk by grouping them in virtual volumes. It also enables the easy growing of existing partitions (but only if the filesystem permits it). That leads to a more scalable disk management because adding or deleting space is really easy without having to repartition the whole machine (most the time a server reinstallation is necessary).
Basic notions
The method used by LVM2 to manage many disks as one unit is to group them in what is so called a volume group For this, it is mandatory to create a physical volume, operation that prepares one partition, one entire disk or one file in a LVM2 usable format.
This can be done by the pvcreate commmand.
As an exemple, if I have one 6.4GB disk located in /dev/hdb and one 40GB disk located in /dev/hde, this is how I would initilize them:
pvcreate /dev/hdb
Physical volume "/dev/hdb" successfully created
pvcreate /dev/hde
Physical volume "/dev/hde" successfully created
We can verify that the two physical volumes are presented to the system using the pvdisplay command:
pvdisplay
 --- NEW Physical volume ---
 PV Name               /dev/hde
 VG Name
 PV Size               37.27 GB
 Allocatable           NO
 PE Size (KByte)       0
 Total PE              0
 Free PE               0
 Allocated PE          0
 PV UUID               f0iIbU-ayPe-kpoy-d3bP-hfDP-JqPO-5MVLT7

 --- NEW Physical volume ---
 PV Name               /dev/hdb
 VG Name
 PV Size               6.01 GB
 Allocatable           NO
 PE Size (KByte)       0
 Total PE              0
 Free PE               0
 Allocated PE          0
 PV UUID               yV0Qht-jGSe-jdDo-jErn-cgYi-tbR6-ITqrz1
We now have two disks prepared to use in a volume group. It is now necessary to create a volume group using the vgcreate command (we will call the volume group in this exemple the lvmspace):
vgcreate lvmspace /dev/hdb
Volume group "lvmspace" successfully created
The volume group is now created and is of 6.1GB, fact that we can check with the vgdisplay command:
vgdisplay
 --- Volume group ---
 VG Name               lvmspace
 System ID
 Format                lvm2
 Metadata Areas        1
 Metadata Sequence No  1
 VG Access             read/write
 VG Status             resizable
 MAX LV                0
 Cur LV                0
 Open LV               0
 Max PV                0
 Cur PV                1
 Act PV                1
 VG Size               6.00 GB
 PE Size               4.00 MB
 Total PE              1537
 Alloc PE / Size       0 / 0
 Free  PE / Size       1537 / 6.00 GB
 VG UUID               W7zp0w-pYZk-xkg1-9u37-9kiI-30uM-yA6Yji
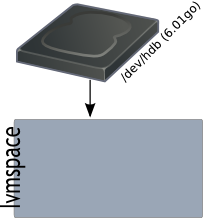
The next operation will extend the volume group with /dev/hde disk size using the vgextend.
vgextend lvmspace /dev/hde
 /dev/cdrom: open failed: Read-only file system
 /dev/cdrom: open failed: Read-only file system
 Attempt to close device '/dev/cdrom' which is not open.
 Volume group "lvmspace" successfully extended
[!NOTE] Don’t pay attention to the warnings related to the cdrom drive.
Here is a representation of the operation that we just did, aggregate two physical disk spaces in one virtual.
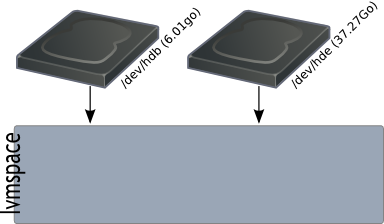
We can verify that the volume group size has changed:
vgdisplay
 --- Volume group ---
 VG Name               lvmspace
 System ID
 Format                lvm2
 Metadata Areas        2
 Metadata Sequence No  2
 VG Access             read/write
 VG Status             resizable
 MAX LV                0
 Cur LV                0
 Open LV               0
 Max PV                0
 Cur PV                2
 Act PV                2
 VG Size               43.27 GB
 PE Size               4.00 MB
 Total PE              11078
 Alloc PE / Size       0 / 0
 Free  PE / Size       11078 / 43.27 GB
 VG UUID               W7zp0w-pYZk-xkg1-9u37-9kiI-30uM-yA6Yji
And now pvdisplay show that the disks have been completely affected to the volume group:
pvdisplay
 --- Physical volume ---
 PV Name               /dev/hdb
 VG Name               lvmspace
 PV Size               6.00 GB / not usable 0
 Allocatable           yes
 PE Size (KByte)       4096
 Total PE              1537
 Free PE               1537
 Allocated PE          0
 PV UUID               yV0Qht-jGSe-jdDo-jErn-cgYi-tbR6-ITqrz1

 --- Physical volume ---
 PV Name               /dev/hde
 VG Name               lvmspace
 PV Size               37.27 GB / not usable 0
 Allocatable           yes
 PE Size (KByte)       4096
 Total PE              9541
 Free PE               9541
 Allocated PE          0
 PV UUID               f0iIbU-ayPe-kpoy-d3bP-hfDP-JqPO-5MVLT7
Now that we have an usable virtual disk space, we can create partitions on it. These partitions are called logical volumes. Let’s create a 7GB logical volume with the lvcreate command:
lvcreate -L 7G -n home lvmspace
 Logical volume "home" created
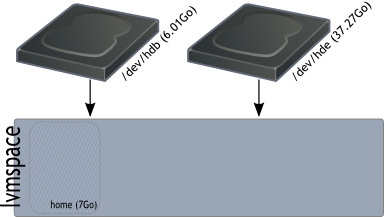
We can see the results of the precedent operation with the lvdisplay command:
lvdisplay
 --- Logical volume ---
 LV Name                /dev/lvmspace/home
 VG Name                lvmspace
 LV UUID                icrus5-H10v-GqTG-NW0L-cwUR-FW2P-T5eqy1
 LV Write Access        read/write
 LV Status              available
 # open                 0
 LV Size                7.00 GB
 Current LE             1792
 Segments               2
 Allocation             inherit
 Read ahead sectors     0
 Block device           253:0
We can also see that the created logical volume consumes all the space of /dev/hdb and a small part of /dev/hde:
pvdisplay
 --- Physical volume ---
 PV Name               /dev/hdb
 VG Name               lvmspace
 PV Size               6.00 GB / not usable 0
 Allocatable           yes (but full)
 PE Size (KByte)       4096
 Total PE              1537
 Free PE               0
 Allocated PE          1537
 PV UUID               yV0Qht-jGSe-jdDo-jErn-cgYi-tbR6-ITqrz1

 --- Physical volume ---
 PV Name               /dev/hde
 VG Name               lvmspace
 PV Size               37.27 GB / not usable 0
 Allocatable           yes
 PE Size (KByte)       4096
 Total PE              9541
 Free PE               9286
 Allocated PE          255
 PV UUID               f0iIbU-ayPe-kpoy-d3bP-hfDP-JqPO-5MVLT7
Let’s now create a logical volume of 20GB named var:
lvcreate -L 20G -n var lvmspace
 Logical volume "var" created
And as result we have:
lvdisplay
 --- Logical volume ---
 LV Name                /dev/lvmspace/home
 VG Name                lvmspace
 LV UUID                icrus5-H10v-GqTG-NW0L-cwUR-FW2P-T5eqy1
 LV Write Access        read/write
 LV Status              available
 # open                 0
 LV Size                7.00 GB
 Current LE             1792
 Segments               2
 Allocation             inherit
 Read ahead sectors     0
 Block device           253:0

 --- Logical volume ---
 LV Name                /dev/lvmspace/var
 VG Name                lvmspace
 LV UUID                GNPaI1-7jlr-oUYZ-6qot-1cS8-gN8G-Ig6cJ2
 LV Write Access        read/write
 LV Status              available
 # open                 0
 LV Size                20.00 GB
 Current LE             5120
 Segments               1
 Allocation             inherit
 Read ahead sectors     0
 Block device           253:1
We now see that 27GB are occupied in the lvmspace.
vgdisplay
 --- Volume group ---
 VG Name               lvmspace
 System ID
 Format                lvm2
 Metadata Areas        2
 Metadata Sequence No  4
 VG Access             read/write
 VG Status             resizable
 MAX LV                0
 Cur LV                2
 Open LV               0
 Max PV                0
 Cur PV                2
 Act PV                2
 VG Size               43.27 GB
 PE Size               4.00 MB
 Total PE              11078
 Alloc PE / Size       6912 / 27.00 GB
 Free  PE / Size       4166 / 16.27 GB
 VG UUID               W7zp0w-pYZk-xkg1-9u37-9kiI-30uM-yA6Yji
Let’s now create two logical volumes, one of 3GB named tmp and one of 13.27GB named portage to fulfill the whole available space:
lvcreate -L 3G -n tmp lvmspace
 Logical volume "tmp" created
lvcreate -L 13.27G -n portage lvmspace
 Rounding up size to full physical extent 13.27 GB
 Logical volume "portage" created
We now see that there’s no more available space in the volume group:
vgdisplay
 --- Volume group ---
 VG Name               lvmspace
 System ID
 Format                lvm2
 Metadata Areas        2
 Metadata Sequence No  6
 VG Access             read/write
 VG Status             resizable
 MAX LV                0
 Cur LV                4
 Open LV               0
 Max PV                0
 Cur PV                2
 Act PV                2
 VG Size               43.27 GB
 PE Size               4.00 MB
 Total PE              11078
 Alloc PE / Size       11078 / 43.27 GB
 Free  PE / Size       0 / 0
 VG UUID               W7zp0w-pYZk-xkg1-9u37-9kiI-30uM-yA6Yji
We are now in the following situation:
ls /dev/lvmspace/
home  portage  tmp  var
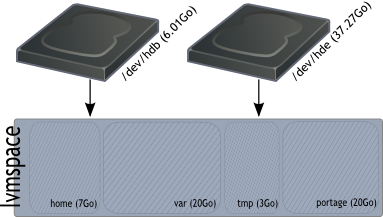
Let’s now create filesystems on these logical volumes to use them as normal partitions:
mkfs.ext3 /dev/lvmspace/tmp -L "/tmp"
mkfs.ext3 /dev/lvmspace/var -L "/var"
mkfs.reiserfs /dev/lvmspace/portage -l "/usr/portage"
mkfs.reiserfs /dev/lvmspace/home -l "/home"
We have now the following:
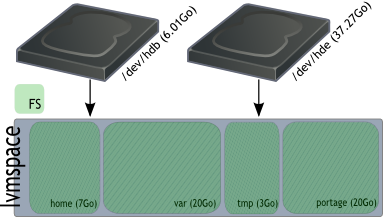
In the next chapter, we’ll see how convenient the usage of LVM2 is.
Logical volume resizing
Let’s add a new physical hard drive to the system, and prepare it for LVM:
pvcreate /dev/hdg
 Physical volume "/dev/hdg" successfully created
Now, extend the volume group:
vgextend lvmspace /dev/hdg
 /dev/cdrom: open failed: Read-only file system
 Attempt to close device '/dev/cdrom' which is not open.
 Volume group "lvmspace" successfully extended
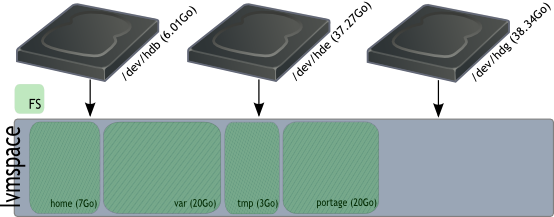
vgdisplay
 --- Volume group ---
 VG Name               lvmspace
 System ID
 Format                lvm2
 Metadata Areas        3
 Metadata Sequence No  7
 VG Access             read/write
 VG Status             resizable
 MAX LV                0
 Cur LV                4
 Open LV               0
 Max PV                0
 Cur PV                3
 Act PV                3
 VG Size               81.62 GB
 PE Size               4.00 MB
 Total PE              20894
 Alloc PE / Size       11078 / 43.27 GB
 Free  PE / Size       9816 / 38.34 GB
 VG UUID               W7zp0w-pYZk-xkg1-9u37-9kiI-30uM-yA6Yji
We will now extend the home logical volume by 3GB. Now, it’s really important to get the fact that we will extend the backend, now the partition that we created on it. It will be necessary to resize the filesystem in order to use the space in it’s totality. The following scheme explains the difference:
lvextend -L +3G /dev/lvmspace/home
 Extending logical volume home to 10.00 GB
 Logical volume home successfully resized
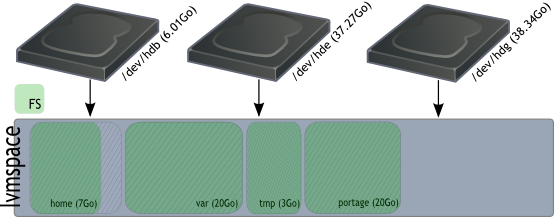
We now see that home is now 10GB big.
lvdisplay /dev/lvmspace/home
 --- Logical volume ---
 LV Name                /dev/lvmspace/home
 VG Name                lvmspace
 LV UUID                icrus5-H10v-GqTG-NW0L-cwUR-FW2P-T5eqy1
 LV Write Access        read/write
 LV Status              available
 # open                 0
 LV Size                10.00 GB
 Current LE             2560
 Segments               3
 Allocation             inherit
 Read ahead sectors     0
 Block device           253:0
We will now extend the filesystem on home using a reiserfs specific command called resize_reiserfs:
[!WARNING] Warning: This can only be done on one unmounted partition.
resize_reiserfs -s+3G /dev/lvmspace/home
resize_reiserfs 3.6.19 (2003 www.namesys.com)

ReiserFS report:
blocksize             4096
block count           2621440 (1835008)
free blocks           2613149 (1826741)
bitmap block count    80 (56)

Syncing..done

resize_reiserfs: Resizing finished successfully.
We will now extend var and the filesystem with the resize2fs command by 5GB :
[!NOTE] Info: Unlike resize_reiserfs, it’s possible to extend a ext3 filesystem without having to dismount the logical volume. This should be considered as an serious asset of ext3 over reiserfs on production systems.
lvextend -L +5G /dev/lvmspace/var
 Extending logical volume var to 25.00 GB
 Logical volume var successfully resized
resize2fs /dev/lvmspace/var 25G
resize2fs 1.38 (30-Jun-2005)
Resizing the filesystem on /dev/lvmspace/var to 6553600 (4k) blocks.
The filesystem on /dev/lvmspace/var is now 6553600 blocks long.
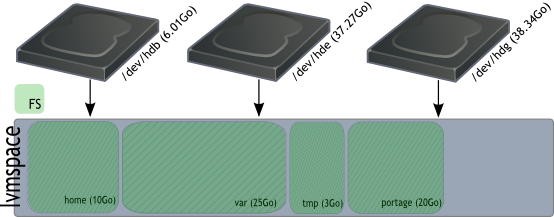
We have the following situation:
Logical volume shrinking
Let’s say for some reason that we don’t want to have 10GB on home. The method to follow to proceed with the shrinking is first to shrink the existing filesystem then shrink the logical volume :
[!WARNING] Alert: You can crash you data when shrinking, so be carefull !
Filesystem shrink :
osiris ~ # resize_reiserfs -s-1G /dev/lvmspace/home
resize_reiserfs 3.6.19 (2003 www.namesys.com)

You are running BETA version of reiserfs shrinker.
This version is only for testing or VERY CAREFUL use.
Backup of you data is recommended.

Do you want to continue? [y/N]:y
Processing the tree: 0%....20%....40%....60%....80%....100%    left 0, 0 /sec

nodes processed (moved):
int        0 (0),
leaves     1 (0),
unfm       0 (0),
total      1 (0).

check for used blocks in truncated region

ReiserFS report:
blocksize             4096
block count           2359296 (2621440)
free blocks           2351013 (2613149)
bitmap block count    72 (80)

Syncing..done

resize_reiserfs: Resizing finished successfully.
Logical volume resize :
lvresize -L -1G /dev/lvmspace/home
 WARNING: Reducing active logical volume to 9.00 GB
 THIS MAY DESTROY YOUR DATA (filesystem etc.)
Do you really want to reduce home? [y/n]: y
 Reducing logical volume home to 9.00 GB
 Logical volume home successfully resized
You now know how to embiggen and shrink logical volumes and extend volume groups, you can now do many things with this awesome technology that LVM is !